If you are citizen of an European Union member nation, you may not use this service unless you are at least 16 years old.
You already know Dokkio is an AI-powered assistant to organize & manage your digital files & messages. Very soon, Dokkio will support Outlook as well as One Drive. Check it out today!
Welcome to my Final Project for class EE47 at Stanford.
Short Description:
This is a glove that can sense finger presses and hand flexes to do mouse functions like moving the cursor, left-clicking, right-clicking, and scrolling. Watch this to learn more:
Long Description:
Watch this video and read below:
The Glove Mouse is designed to be a fun way of controlling the mouse on a computer. My main purpose was to have a fun way of flipping through Powerpoint presentation without a remote or having to walk to the computer repeatedly. The Glove Mouse has three basic components: the Glove, the Code, and what I like to call the WristHub. Here I will describe some of the design choices I made with each component.
Glove
The Glove houses the flex sensor and the two force sensors. The flex sensor is stitched into the last finger of the glove and allows hand flexes to emulate clicking. I put the flex sensor on the last finger because it reduces accidental clicking when you just want to move the mouse. Using one flex sensor is actually the optimal solution with soft gloves because bending just one might make your other fingers move as well. With one flex sensor, you no longer need to monitor your own hand movements. Instead of single finger movements, you can just flex your entire hand to click, which is more fun.
The two force sensors are free floating, meaning that they are not attached to the glove per say, but are instead bent into a joystick-like position using the jumper wires connected to the WristHub (imagine a Wii Nunchuk). This makes the force sensors repositionable. I can make them into a joystick or place them on my fingertips. This helps because sometimes one mode will allow easier ways of pressing the force sensor. I used two force sensors because of time constraints, but I think that this system is somewhat simpler than having to memorize what direction each finger controls.
WristHub
The WristHub is a Arduino Micro and Graphical LCD mounted on a perfboard with 3 buttons, which is tied to a piece of cardboard using pipe cleaners. A velcro wrist strap is used to attach this to a wrist. This is where information about the device state can be viewed.
For example, the Arduino supports a Mouse Mode. This makes the Arduino act like a USB mouse, but renders it unprogrammable. To easily know if the Glove Mouse is in Mouse Mode, the Graphical LCD shows the variable's value on the screen. In addition to showing Mouse Mode, the WristHub also shows what click the Flex sensor will perform (left-click, right-click, scroll), the name of the device, my name, and the direction the mouse will move(Up, Down,Left,Right).
The WristHub also has 3 buttons. The middle one turns on and off MouseMode(the flex sensor will no longer click). The bottom one changes what type of click the flex sensor does. The top one changes the direction, in case the force sensor is not responding correctly.
Code
/*
* This code will use 2 FSR's, 1 flex sensor, and 3 buttons to control a computer's mouse via USB cable.
* This is all thanks to the code from class EE47 at Stanford, specifically their String.ino and BTArduino.ino files.
*/
#include <SPI.h>
#include <Adafruit_GFX.h>
#include <Adafruit_PCD8544.h> // These libraries are for the graphic LCD display that I will use for debug messages.
// pin 7 - Serial clock out (SCLK)
// pin 6 - Serial data out (DIN)
// pin 5 - Data/Command select (D/C)
// CS is not connected to Arduino, and as such is listed as pin -1.
Female Headers for force sensors, nokia 5110, level shifter, arduino micro
Jumper Wires (solid)
Pipe cleaners
cardboard
wrist strap
velcro
Glove
Steps:
Solder on header pins on breadboard for Arduino Micro, Graphical LCD, and level shifter
Connect the following (taken from lab 5 of EE47)
Graphical LCD
Connection
1 - GND
-->
GND
2 - VCC
-->
3.3V
3 - CLK
-->
4050 Pin 10
4 - DIN
-->
4050 Pin 12
5 - D/C
-->
4050 Pin 15
6 - CS
-->
GND
7 - RST
-->
Voltage Divider at 3.3V
8 - LED
-->
3.3V (no pullup required)
Arduino Pin 3
-->
Voltage Divider at 5V
I used three 220 ohm resistors for the voltage divider.
4050
Connection
Pin 1
-->
3.3V
Pin 8
-->
GND
Pin 9
-->
Arduino D7
Pin 11
-->
Arduino D6
Pin 14
-->
Arduino D5
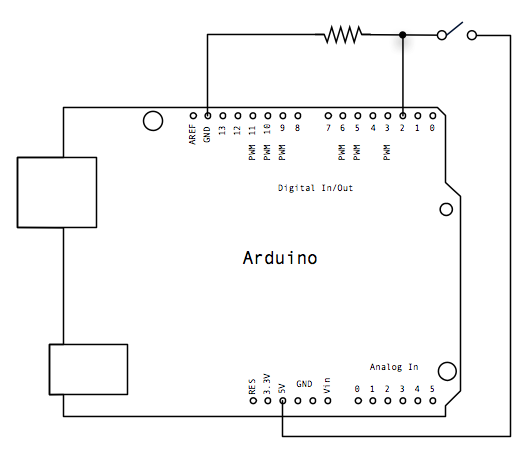
3. Solder on buttons and wire them each like the following : https://www.arduino.cc/en/tutorial/button to digital pins 2, 9 ,12, or just change the pin numbers in the code. It's easiest to use a common 5 voltage bus.
4. Add the wiring for the the sensors. Make sure to use long enough wires. I used 27kohms for the flex sensor and 33kohms for the force sensors. The force sensors are connected to A1 and A2 and the flex sensor is connected to A0. I recommend taping the FSRs to a female header with electrical tape and then soldering the header to the jumper wires instead of directly soldering to avoid burning the FSR. Use electrical tape on the exposed contacts of the flex sensor as well.
5. Punch 4 holes in a piece of cardboard the size of the perfboard and put them together with pipe cleaners.
6. Attach a wrist strap in between the perfboard and carboard to secure it. Add velcro on the strap.
7. Sew the flex sensor to the top of the last digit of the glove.
8. Upload the code and have fun!
Design Plan:
The need I wanted to address primarily was to allow presenters to have both hands free for hand gestures during Powerpoints and not having to interrupt the presentation by going back to the computer. The current major device for making Powerpoints easier is a remote, but that requires a hand to hold it.
Here is my initial plan:
Deadline: Saturday August 15
Plan A: Glove that performs all the functions of a bluetooth mouse
Removable Features: bluetooth, middle click
Plan B: Wrist strapped cursor mover
Tasks:
On/Off Button
Use buttons to move cursor
use potentiometers to move cursor
use flex sensors to move cursor
use accelerometer to move cursor
FSR sensor to click (left, middle, right)
Paper prototype
double-click?
Get a glove - sew, use old gloves, tape?
analog stick to move cursor?
decide which input to use to move cursor
arduino to computer bluetooth communication
Write- Up
Here is my initial ideas:
Here is my Verplank Diagram:
Here is my state diagram:
I changed my plans later however. This is what I did and the mistakes along the way.
Tasks:
Test how the arduino changes into a mouse using simple button circuit
Use potentiometers to find out how analog input can be translated into mouse movement
Use FSR sensors to move cursor
Use flex sensor to left-click
Make perfboard with LCD display and arduino and level shifter. To make things easier, I used different buses for power and ground instead of using just the arduino port. It took a long time to figure out why the lcd screen wasn't displaying after finishing. It turned out that the chip didn't lock onto the female headers so I used a DIP adapter and it suddenly worked.
Wire three buttons onto perfboard. I tried to see if I could get away with using one power line and one ground line to power all three buttons, but soon discovered that pushing one button triggered all the other buttons. I had to resolder the ground connection so that each button has its own 10K resistor.
I wired up the HC-05, but discovered that I had no way of telling the PC what to do with the bluetooth commands it received without writing another program. I decided to focus my attention on the flex and force sensors because I would have had to order a bluetooth 4.0 board.
I then wired up the flex sensor and tested it to see if it could click my mouse. I soldered directly to the flex sensor, but I should have probably electrical taped it to a female header and then soldered that to the wires.
I wired the two force sensors by soldering the wires to a female header and then electrical taping the force sensors. I was worried that the soldering iron might burn the contacts. I didn't measured the wire lengths before I soldered the wires on. I should have measured the glove and matched it with the length of the wire.
Then I put the perfboard onto the board with pipe cleaners (keyrings didn't work well) and put a velcro wrist strap on it.
I tried to electrical tape everything to my glove, but I eventually sewed the flex sensor to make it more stable. The FSR's I did not sew on.
Then I refined the code so that I could adapt it for 2 force sensors, one flex sensor, three buttons, and a graphical LCD. (Lots of switch statements).
Even though I reached my goals of making an Arduino powered glove emulate a USB mouse, there are numerous ways to move further than what I did. For one thing, adding more force sensors would make moving the mouse a breeze compared to the two I have now. If a force sensor is attached to each finger except the thumb, a pinching motion with each finger could move the cursor in different directions.
I had initially tried to make my mouse bluetooth using the HC-05 so that movement is no longer hindered by the usb cable, as can be seen in the empty socket on the right of the graphical lcd. However, after some testing, I figured out that to give the glove bluetooth compatability, a bluetooth board supporting bluetooth 4.0 was needed so that the computer knew the device was a mouse. Another option could have been to have the glove send data to the computer and then writing a computer program to decipher this data into mouse commands. Sadly, I did not have enough time to implement this feature.
Another cool feature I initially thought of adding is an accelerometer to either the palm or the back of the glove. This could detect x and y movement and send it to the computer as mouse movements. I believe that this coupled with the aforementioned bluetooth feature will make this glove mouse feel intuitive and achieve my ultimate goal.
Great work! We love your idea and think the project is practical.
The lab report is also awesome. Detailed videos and diagrams are provided. Well done! Also, we are glad that you have overcome all the hard problems that you faced in the process, which can really help you learn a lot.
We wish that you could provide more detailed pictures on the circuits and implementations, which can help others to learn more about it!
We hope that you could continue the work on this product and make it better, even a real product that can be used by millions of people!!
Well done in the summer and good luck!!!!!
You don't have permission to comment on this page.


Comments (1)
xyyue@... said
at 1:35 pm on Aug 18, 2015
Hi Arvind,
Great work! We love your idea and think the project is practical.
The lab report is also awesome. Detailed videos and diagrams are provided. Well done! Also, we are glad that you have overcome all the hard problems that you faced in the process, which can really help you learn a lot.
We wish that you could provide more detailed pictures on the circuits and implementations, which can help others to learn more about it!
We hope that you could continue the work on this product and make it better, even a real product that can be used by millions of people!!
Well done in the summer and good luck!!!!!
You don't have permission to comment on this page.